Monday, March 27, 2017

Big, Tender, Fluffy and Delicios

I am NOT talking about myself. I have set for myself a goal to make a good, no great biscuit. The recipes that I have tried have been dense or flat or lacking in flavor. I decided to try again today, and pulled out my old reliable church cookbook from the 80s and found a recipe from an old family friend, Jewel Parks. Easily made, but messy, the end result on these biscuits is well worth the effort. I can honestly say that I have never made a better biscuit.

Buttermilk Biscuits

4 c self-rising flour
3/4 c shortening
1 Tbs sugar
1 Tbs baking powder
2 cups buttermilk*

Preheat oven to 500 degrees. Mix together dry ingredients. Work in shortening and add buttermilk. Place on a lightly floured board and knead a few times. Roll or pat out to 1/2" and cut with biscuit cutter. Place touching on a lightly greased baking sheet. Bake until done (tops are golden brown). Brush with melted butter.

*I used less buttermilk and it took about 10 minutes for the biscuits to get done. I made 22 biscuits.


Grab the butter and the jam and enjoy!

Friday, November 18, 2016

Breakfast for Supper

Breakfast. I don't love it, especially in the mornings. I am usually happy with a cup of yogurt and a piece of fruit or a piece of cheese toast. This is something that I have dealt with all of my life. My sister would chow down on eggs over easy with the yolk running all over the plate, but I have never been a big fan of eggs. Then, one day Mom discovered that she could give me a Pop Tart and call it a hot breakfast. Brown sugar an cinnamon Pop Tarts got me through my teen years.

But every now and then, I want breakfast for supper. Recently, I decided to try biscuits once again and pulled up a recipe from the White Lily website. I didn't love'em. I am willing to take the blame for this one; I did not use White Lily flour, but instead I used what I had on hand, a no name brand of flour from Aldi's. I will try again one day, and keep trying until I succeed.

Tonight I had a craving for pancakes and when the craving strikes, a girl's gotta do what a girl's gotta do. I used Lucinda Scala Quinn's recipe for Old Fashioned Pancakes.

Old Fashioned Pancakes

SOURCE: MAD HUNGRY, SEPTEMBER 2010

INGREDIENTS

1 1/2 cups all-purpose flour
1 tablespoon sugar
1 teaspoon coarse salt
2 3/4 teaspoons baking powder
1 large egg, lightly beaten
1 1/4 cups milk
3 tablespoons unsalted butter, melted, plus more for serving
Vegetable oil, for the griddle
Pure maple syrup, warmed, for serving
DIRECTIONS

Place a heat-proof platter into a warm oven (at 200 degrees).
In a large bowl, whisk together the flour, sugar, salt, and baking powder. Make a well in the center of the flour mixture. Add in the egg, milk, and 2 tablespoons of the butter. Whisk from the center, slowly incorporating the flour. Rest the batter for 10 minutes.
Heat a large well-seasoned cast-iron skillet or favorite griddle over medium-high heat. Swirl the remaining tablespoon of butter in the skillet (or use oil to coat the griddle) and immediately pour in 1/4 cup of batter for each pancake. When bubbles rise to the surface, flip the pancakes, slightly reduce the heat, and cook until the bottoms are golden and the centers are cooked, about 1 minute. (Rarely does the first pancake work because it takes a bit of time to get in the groove with the heat, fat, and batter.)
As the pancakes come out of the skillet, place them on the warm platter in the oven until ready to serve. Serve a stack of 3 pancakes, topped with more butter and the maple syrup.

These are thick and fluffy, light as air and delicious. They are not pretty, but again, I will take the blame for that. I seldom make pancakes, and when I do, they almost never look like the ones in photos.


Have you ever seen a TV chef taste something and come out with something like an orgasmic sigh and eye roll? These pancakes literally made me do that with each bite, sitting alone in my kitchen. A little drizzle of maple syrup and a little dab of salted butter was all they needed.

Wednesday, November 2, 2016

Not Your Typical Hot Day Meal

I had an aunt who could neither read nor write. Now we know that suffered from dislexia, but it was not a known ailment 90 years ago. However, she made two things that I have never had better...fried apple pies and chicken and dumplings. No written recipes, so no one knows how to recreate either. I have, over the years, tried my hand at fried apple pies to some success, but my best attempt at chicken and dumplings has been a slow cooker recipe with canned biscuits and cream of chicken soup.

So I decided on a day of record heat to try a recipe from scratch. I searched the net for a recipe and found the one below on Food.com.

Chicken and Dumplings

INGREDIENTS
1 large fryer chicken, cut up
2 celery ribs, sliced
4 carrots, peeled and sliced
1 medium onion, diced
2 c chicken broth
2 chicken bouillon cubes
2 tbs dried parsley
1 1/2 tsp salt
1/2 tsp pepper
Water

DUMPLINGS
2 c all purpose flour
4 tsp baking powder
1 tsp salt
4 tbs oil*

DIRECTIONS
1. Combine chicken, celery, carrots, onion, chicken broth, bouillon, parsley, salt and pepper in a large pot and add enough water to cover cicken.
2. Bring to a boil and reduce to simmer and cover. Cook for two hours or until chicken is done.**
3. Remove chicken and let cool until it is easy to handle. Remove skin and bones and shred chicken. Dispose of bones and skin and add chicken back to pot.
4. Add more salt and/or pepper if needed. Return to simmer.
5. In a large mixing bowl, combine dumpling ingredients and mix until forms a stiff dough.
6. Drop by tablespoons into simmering soup. Cover and let simmer for 15 to 20 minutes.
7. Serve immediately.

Makes 4 to 6 servings.

*I used canola oil, but corn or vegetable oil will do.
**My chicken was done in about 90 minutes, so start checking early.


This will never compare with Aunt Alma's, but it will do. Peppery, creamy, with light, fluffy dumplings, it will do.


Thursday, October 27, 2016

BAKING FOR GOOD AND BAKING A BIRTHDAY CAKE

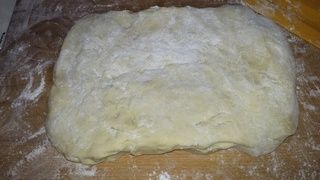
I have signed up for King Arthur Flour's Baking for Good and have been a baking fool. I am fascinated by scones and have, in the past, not been happy with the recipes I've tried. I found this recipe on the King Arthur website and gave it a whirl.

Scones

2 3/4 c unbleached all purpose flour
1/3 c sugar*
3/4 tsp salt
1 tbs baking powder
1/2 cold butter
1 to 2 cups dried fruit, chopped nuts, chocolate chips, or combination**
2 large eggs
2 tsp vanilla***
1/2 to 3/4 cup half and half or milk****

Topping
2 tbsp milk
2 tbs cinnamon sugar

Directions
Whisk together flour, sugar, and baking powder in a large mixing bowl. Work in butter until it is unevenly crumbly. Stir in fruit and nuts.

 photo 20161022_152903_zpsz1owsudl.jpg

 photo 20161022_153541_zpsoruhm2mw.jpg

In another bowl, whisk together eggs, vanilla, and milk or half and half. Add to dry ingredients and stir until all is moist and holds together.

Line a baking sheet with parchment and sprinkle with flour. Scrape dough onto parchment and form into two rounds, approx 6" in diameter and 3/4" thick.*****

 photo 20161022_155416_zpsr3qvbpjd.jpg

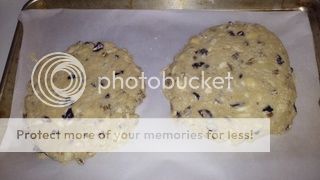
Brush each round of dough with milk and sprinkle with cinnamon sugar. Run a knife under cold water and cut each round into six pieces. separate wedges, leaving 1/2" between each. Place pan in freezer for 30 minutes.

 photo 20161022_160250_zpshehj5ocr.jpg

Remove pan from freezer and place in a 25 degree oven for 20 to 25 minutes or until golden brown. Cool briefly and serve warm.

 photo 20161022_170201_zpsbuplnw1a.jpg

*I used 1/2 cup of sugar for a sweeter scone.
**I used what I had, 1/2 cup of dried cranberries and 1/2 cup chopped pecans.
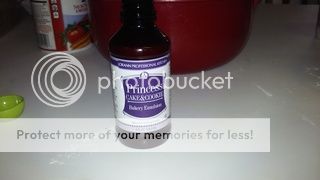
***I used 2 tsps of baking emulsion. photo 20161022_154411_zps6hdznz4v.jpg
****I had milk and I had heavy cream, so I made half and half.
*****Cover the dough with a piece of plastic wrap to shape it and keep your hands clean.

These are moist and delicious. I think that the next time I make this recipe, I will use chocolate chips and almonds and almond extract.

My Dad had a birthday this week and I decided to make for him his favorite carrot cake. This recipe is from the October 1994 issue of Bon Appetite.

Three Layer Carrot Cake with Cream Cheese Frosting

Serves 10.

Cake
2 cups sugar
1 1/2 cups vegetable oil
4 large eggs
2 cups all purpose flour
2 teaspoons baking powder
2 teaspoons baking soda
1 teaspoon salt
1 teaspoon ground cinnamon
3/4 teaspoon ground nutmeg
3 cups finely grated peeled carrots (about 1 pound)
1/2 cup chopped pecans (about 1/2 ounce)
1/2 cup raisins

Frosting
4 cups powdered sugar
2 8-ounce packages cream cheese, room temperature
1/2 cup (1 stick) unsalted butter, room temperature
4 teaspoons vanilla extract

For cake:
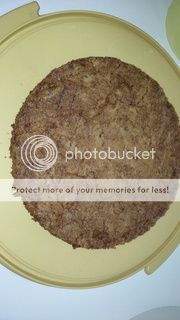
Preheat oven to 325°F. Lightly grease three 9-inch-diameter cake pans with 1 1/2-inch-high sides. Line bottom of pans with waxed paper. Lightly grease waxed paper. Using electric mixer, beat sugar and vegetable oil in bowl until combined. Add eggs 1 at a time, beating well after each addition. Sift flour, baking powder, baking soda, salt, cinnamon and nutmeg into sugar and oil mixture. Stir in carrots, chopped pecans and raisins.

 photo 20161025_105532_zpsa9m5xdqj.jpg

Pour batter into prepared pans, dividing equally.
Bake until toothpick inserted into center comes out clean and cakes begin to pull away from sides of pans, about 45 minutes. Cool in pans on racks 15 minutes.
Turn out cakes onto racks and cool completely. (Can be made 1 day ahead. Wrap tightly in plastic and store at room temperature.)

 photo 20161025_131118_zpsjsizi9fa.jpg

For frosting:
Using electric mixer, beat all ingredients in medium bowl until smooth and creamy.

Place 1 cake layer on platter.
Spread with 3/4 cup frosting. Top with another cake layer. Spread with 3/4 cup frosting. Top with remaining cake layer. Using icing spatula, spread remaining frosting in decorative swirls over sides and top of cake. (Can be prepared 2 days ahead. Cover with cake dome and refrigerate.) Serve cake cold or at room temperature.

Turn out cakes onto racks and cool completely. (Can be made 1 day ahead. Wrap tightly in plastic and store at room temperature.)

For frosting:
Using electric mixer, beat all ingredients in medium bowl until smooth and creamy.

Place 1 cake layer on platter.
Spread with 3/4 cup frosting. Top with another cake layer. Spread with 3/4 cup frosting. Top with remaining cake layer. Using icing spatula, spread remaining frosting in decorative swirls over sides and top of cake. (Can be prepared 2 days ahead. Cover with cake dome and refrigerate.) Serve cake cold or at room temperature.

 photo 20161025_135414_zpsnoeugvpt.jpg

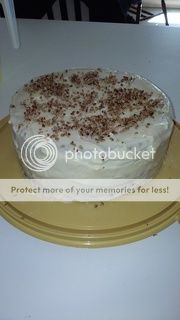
This cake is spicy, and rich, and delicious. And the frosting is the best cream cheese frosting, ever. I use it often for other cakes.

Monday, October 17, 2016

The Big Blonde Moment

I decided to try my hand at brioche. I searched the internet and found a very detailed and informative recipe that seemed ideal for a beginner. I had the recipe for a few days before actually trying it because the timing for brioche is complicated if you have, you know, a life. I made the batter yesterday and did the baking today. This will be explained later. The recipe comes from TheKitchn.com.

Ingredients

2 sticks of butter at room temperature
1 tbs active dry yeast
1/2 c warm milk
1/4 c sugar
6 large eggs
2 tsp salt
4 to 4 1/2 cup all purpose flour
1 egg yolk
1 tbs water

Instructions

1. Combine the milk and yeast in the bowl of a stand mixer and let stand for a few minutes.

 photo 20161016_171457_zpserp6fnyn.jpg">

Add sugar and eggs and stir until fully blended. Add the salt and 4 cups of flour until it forms a shaggy dough. I think this looks shaggy.

 photo 20161016_174242_zpscziuyn0j.jpg

2. Using the dough hook, knead the dough for 2 minutes, until flour is fully absorbed and dough pulls away from sides of bowl.

3. Increase mixer speed and begin adding butter, I tablespoon at a time, making sure that each tablespoon is fully incorporated before adding the next. Stop occasionally to scrape down the sides. Beat for five minutes. Dough should be glossy and jiggle like custard.

4. Loosely cover and move to a warm place. Allow 1 to 1 1/2 hours to rise.

5. When dough has doubled in size, cover tightly with plastic wrap and place in refrigerator overnight. If it looks as though the dough will spill over the sides of the bowl, lift the wrap and degas but do not punch.

6. The next day, prepare two loaf pans. Remove dough from fridge and place on floured board. Divide the dough in half. I formed half into a standard loaf. The other half I rolled into 6 round balls and placed in the loaf pan to resemble a braid.

 photo 20161017_075633_zpsuvdottrx.jpg">

 photo 20161017_095811_zpsjdvfdc1b.jpg">

7. Whisk together egg yolk and water and brush over top of loaves.

8. Place in a preheated 350 degree oven and bake for 30 to 40 minutes.

9. Remove from and oven and cool for 5 minutes in the pans. Gently remove from pans and allow to cool on a rack.

 photo 20161017_122605 1_zpstlzuplaq.jpg

I should note, here, that I have never had brioche and it is not easily found living out in the sticks, so I really have nothing to compare it with.

For dinner tonight, I made a pot of creamy tomato soup (recipe found here and sliced the bread thin and made sandwiches with honey mustard, smoked turkey, cheddar cheese, bacon, slice apple, and butter then toasted it. There are no pictures because they were gobbled up quickly.

Now to the blonde moment. While reading the recipe, I looked at degas and for some reason saw Degas, the famous French impressionist. I was so confused and assumed it was a term known to advance bakers. I Googled it and was even more confused because they all talked about punching the dough. This morning, the light bulb went off over my head and realized it was de-gas, or remove the gas bubbles. I have laughed all day, thinking about it.

Saturday, October 8, 2016

Magic in the Air

Two new recipes this week, and I did them both on the same day. First the entree.

I often make a dish called South of the Border Stuffed Shells that came from a former member of the Contessa's Kitchen discussion board in which jumbo shells are stuffed with seasoned meat, placed in a dish of salsa, covered with salsa, sprinkled with Monterey Jack cheese, and baked. It makes a lot and is great for potluck dinners. But I had always wanted to try a traditional, Italian stuffed shells. So, like any 21st century cook, I took to the internet and found this recipe.

Two things were different. I had made a very large pot of marinara a couple of months ago and had put several containers in the freezer. I pulled one out for this dish. And the recipe called for Italian seasoning, which I did not have, so I just winged it. So, this is my version.

Ricotta and Spinach Stuffed Shells.


24 jumbo shells
15 oz Ricotta cheese
1 10 oz pkg frozen spinach
1 large egg
1 c grated parmesan chees
2 c grated mozerella cheese
salt and pepper
1/2 tsp basil
1/4 tsp oregano
1/4 tsp garlic powder
Pinch of nutmeg
Marinara

Cook shells in salted, boiling water for 9 minutes, then drain. Mix together ricotta, spinach, parmesan, 1 cup mozerella, and herbs. Taste and add salt and pepper if needed. Add the egg and mix well.


Spray a 9" x 13" baking dish with cooking spray and spread with a thin layer of marinara. Put about 1 tbs of filling in each shell and place seam down in the sauce. Top with sauce and remaining mozerella cheese.


Cover with foil and place in a preheated 375 degree oven for 30 minutes. Remove foil and continue baking for 10 minutes. Allow a few minutes to cool before serving.


On to dessert, and the real magic. I made a magic cake! Have you seen this?


Three Layer Magic Cake


4 eggs, separated
3/4 cup of sugar
1 tsp vanilla
1 stick unsalted butter, melted
3/4 cup all-purpose flour
2 cups luke-warm milk

Preheat the oven to 325. Prepare an 8" x 8" pan with butter or cooking spray. Beat egg whites to stiff peaks and set asside.


Beat yolks and sugar until pale yellow. Add butter and vanilla and mix well. Add flour and beat until just combined.


Fold in egg whites. This is a very loose batter and there will be lumps of egg whites.


Pour into pan and bake until golden brown and the center of the pan does not jiggle when loosely shaken. The original recipe said 40 to 50 minutes, but it took mine about an hour. I started checking at about 30 minutes because the top was golden brown but it was very jiggly. I loosely covered it with foil and checked every 10 minutes or so until it was done. Let it cool for 0 minutes in the pan and turn out onto rack to cool. I placed the foil I had uses earlier on one rack, turned it onto the foil, than flipped it back onto a second rack. I then covered it with a chocolate ganache*.


Cut the cake and magically, there are three layers inside.


*Ganache made by heating 1/4 cup heavy cream in the microwave for 1 minutes and adding 3 oz of chopped semi-sweet chocolate, stirring until mixed.

If you love a custard, this is a wonderful dessert.


Friday, September 30, 2016

Summer Review and What's New

Helllooo! Is anyone still there?

I know that I've been missing a while, but I had a bit of a crazy summer.

My summer included some ribs using a recipe from a famous pitmaster. Here they are before going on the grill.

And here they are after 4 1/2 hours on the grill.


There was really nothing else of interest...except that I have become an official recipe tester for America's Test Kitchen and Cook's Country.

So far, I've made a one pan breakfast with sausage, potatoes, and egg in the hole, pork stir fry, meatballs in marinara, and a ricotta chicken. Some were better than others, but all were good.


I went to the grocery store with a plan this week. I had my menu for the week all prepared, I had the weekly ad in hand. I had my list made out in the order of the store.

I came home with almost everything on my list (I forgot lemons and Kaopectate) and didn't stray far off the list. Except, they had puff pastry by one get one free.

And how could I sit here, knowing that in my freezer was a box of nearly endless possibilities. I opened the pantry, looking for inspiration and found some. The results were mini chocolate turnovers and cherry danish.


I thawed the pastry using the instructions on the box before rolling the first sheet out on a floured board to a 12" x 12" square and then cut 16 3" x 3" squares. I placed a square of semisweet chocolate on each before rubbing the two sides with an egg wash and folding it into a triangle. I pressed the edges together and brushed the top with egg washed. Placed them on a parchment lined baking sheet and baked them at 400 degrees until browned.

The other sheet was rolled out to 10" x 10" and cut into 9 squares. I put some cherry pie filling diagonally on each square and placed some egg wash on two corners before folding them to the middle. Brushed the pastry with egg wash and baked at 400 degrees until done.


I drizzled everything with a glaze made from heavy cream, confectioner's sugar, and vanilla.


While they are warm, the gooey chocolate oozes from the center of the flaky pastry. If you grab one that is cold, pop it in the microwave for 10 seconds and you can once again dark chocolate heaven.

Puff pastry is an easy way to make a danish and I've used it before. I made Ina Garten's cream cheese danish years ago. But I had cherry pie filling in the pantry. Couldn't hurt, right?

On another note, I seem to have cured my brown thumb. I have managed to keep a houseplant alive for a year now. I have a tomato plant that is indeterminate. In case you are unfamiliar with the term, it has bloomed again and still has tomatoes at the end of September! And, having seen something on Facebook, I am growing romaine lettuce from the ends of heads I cut to make salad.


So, how you doin.?